I had a rough weekend. I had these glorious plans of eating and sewing all weekend long. However, my weekend did not quite play out that way.

Showing posts with label Fall Decor. Show all posts
Showing posts with label Fall Decor. Show all posts
Monday, October 21, 2013
Sunday, March 20, 2011
Wooden Crate Transformation
Hope you all had a great weekend! I had a fun weekend, but it was way too short. I really could have used one more day to relax!
I spent my weekend crafting.
I made some really great projects...
and a couple of not so successful ones. I won't discuss those ones. :)
Over the weekend, I went to our local goodwill store and found a small wooden crate.
Here is the before.

Here is the after.
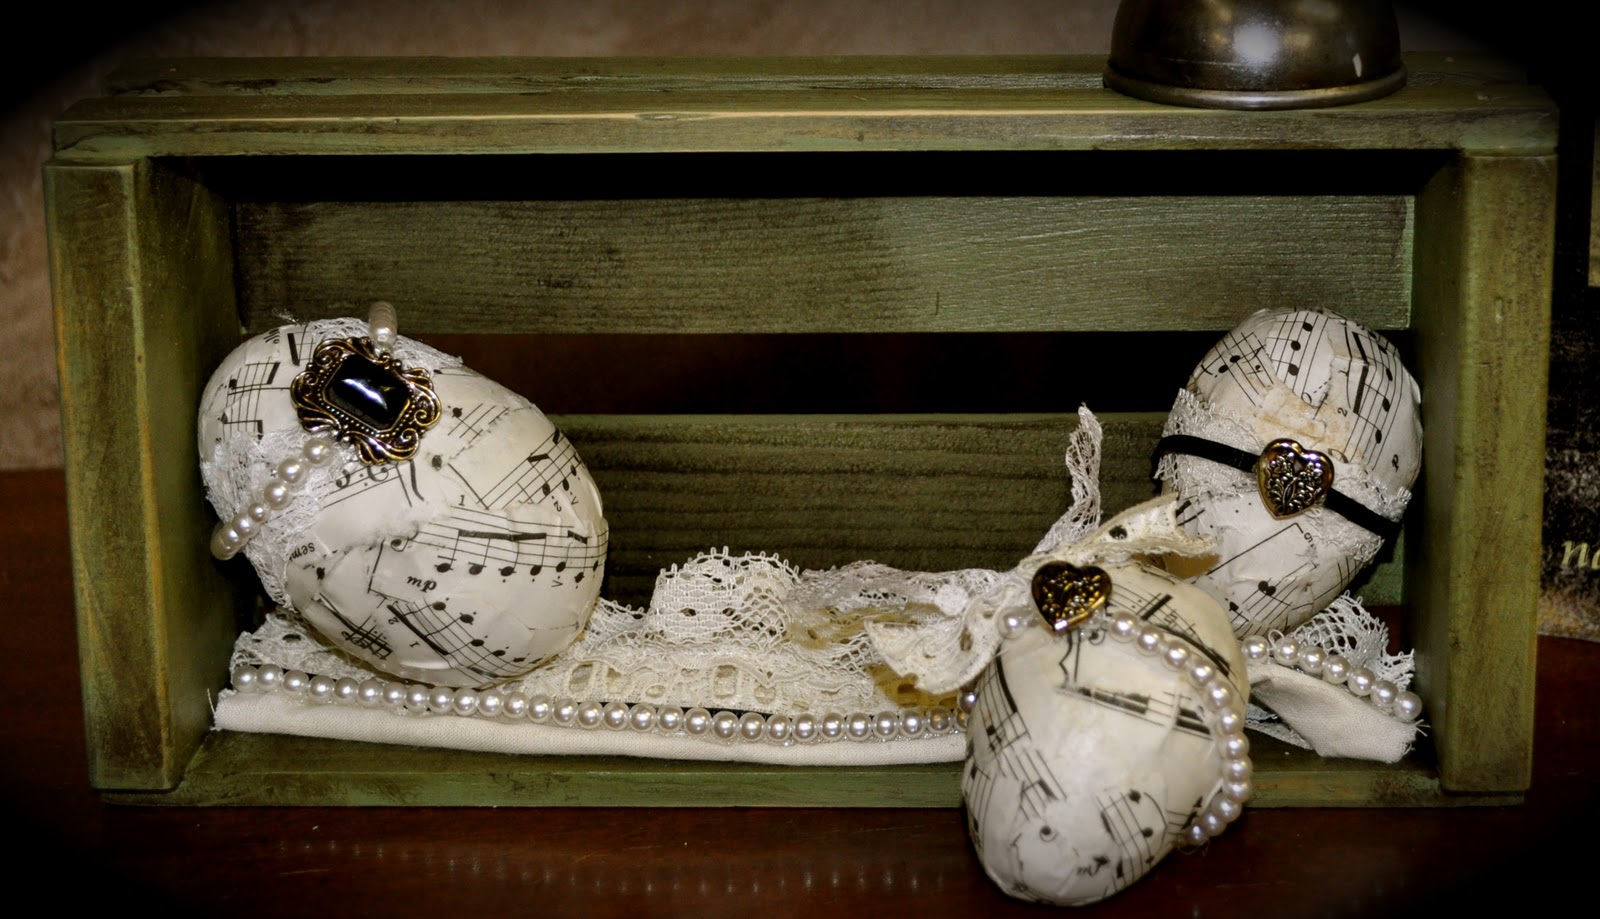
I LOVE it!
I painted it green, and then used some wood stain to distress it.

I also made these eggs over the weekend as well. I got my inspiration from HERE.
LOVE how they turned out.
I will be posting the tutorial for the eggs later this week!
Linky Parties:
Making the world Cuter
Craftomaniac Monday
MMM
Skip To My Lou
The House Creative
Get Your Craft On!
Linky Parties:
Making the world Cuter
Craftomaniac Monday
MMM
Skip To My Lou
The House Creative
Get Your Craft On!
Tuesday, September 14, 2010
Halloween Crafts!
October is right around the corner and I have slowly been getting things out of boxes to decorate the house! Last year I made some of my favorite decorations for Halloween and I just wanted to share them again incase you still are needing some fun and easy crafts to do for Halloween!

These mummies are made out of terra cotta pots!! They are so darn cute and they can be used as candy dishes!! I posted the tutorial here:

This pumpkin is one of my favorite Halloween crafts! It is so easy to make and is super cute! You can find the tutorial here:
Last year I was so busy with So You Think You're Crafty that I never posted a tutorial for this project. This is more of a Fall project, but it is my favorite! I love how rustic it is.
To make this all you need is an old frame, some burlap, paint, and buttons. I made a stencil with my cricut machine and that's all there is to it! It is so easy, but I love it!

Saturday, November 14, 2009
Button Trees

I love using buttons and my new favorite love is burlap! I used both of these things in creating this fall decoration. I got the frame at my local goodwill store for like 2 bucks. The trees are super easy to make and the leaves are just made from buttons. The background is burlap, which is my new favorite thing! You can use burlap to spruce up any project you are doing and it gives it a rustic, but clean look.


Tuesday, November 10, 2009
Harvest Topiary
When I found out the first theme of S.Y.T.Y.C I was really excited because fall is one of my favorite time's of the year and I just love all of the fall colors! When I started brainstorming what I was going to do I just kept thinking that I really wanted to showcase those beautiful fall colors and really represent the theme "harvest" all at the same time.
So this Harvest Topiary is what I came up with! This topiary is the perfect way to spruce up your home with the feel of fall! It even smells great, instead of using a dowel for the center of the topiary I used cinnamon sticks! Clever huh? This project is not only fun to make, it will remind you of the fall's harvest every time you look at it!
Hope you enjoy.
Harvest Topiary


Okay, let's get started!!
Supplies Needed:
Terra Cotta Pot (or any other medium sized pot you have)
Barn Red paint
Black paint
Distressing ink
Floral Foam
Floral pliers
Cinnamon Sticks (the long ones)
Floral Moss
Faux pumpkins, apples, flowers, leaves.
( I used about 4 pumpkins and 2 apples and 6-8 acorns. You can find these at any craft store. I got mine at Robert's Arts and Crafts. For the flowers I bought three different stems and the leaves I just got off of a fall garland.)
1 1/2 yards of ribbon

Step 1: Paint your pot with the red paint. You might need to do a couple of coats. I did two coats.

Step 2: When your red paint is dry apply with a dry brush some black paint and wipe it off quickly with a paper towel. Do this until you get the color that you want. I also rubbed some dark brown distressing ink all over it as well and rubbed it off until I got the color I wanted.

Step 3: Insert some floral foam in your pot. This holds your cinnamon sticks in place and keeps it steady.

Step 4: Use about 5 long cinnamon sticks and tape them together at the top and bottom. I did this just so they would stay together. You will not see the tape once you've added everything else.

Step 5: Use more floral foam and create a sphere-like shape. (you can definitely buy the already round floral foams, but I didn't have one on hand I just had a rectangle one so I just cut it into the shape I wanted.) Insert your ball of foam on the top of your cinnamon sticks. Make sure you center the foam so that you don't have a lopsided topiary!

Step 6: Start inserting your flowers, leaves, pumpkins, acorns, apples...etc. (you might have to hot glue some of your pumpkins or apples on) You can seriously just start placing them everywhere and I promise it will come together. Just try to keep it in a ball like shape.


Step 7: Place your floral moss all over the top of the pot. You don't have to hot glue this in or anything, just lay it in there until you've covered it completely.


Step 8: To finish it off you will tie a piece of ribbon around the center of your cinnamon sticks into a bow. You then will wrap the rim of your pot with ribbon and tie a knot.

You're Done!
Thursday, November 5, 2009
Autumn Tin

I just wanted to let everyone know that I am still here! It has been a very hectic couple of weeks around here and I promise I have been crafting but it's mostly been for So You Think You're Crafty, so I can't really show you anything! Can I just say this competition is tough!
But, I did just make this autumn tin out of a really ugly Christmas tin I found at the dollar store! I really liked how it turned out and I can't wait to buy more tins and re-do them!
I love crafting, but I don't like to spend a ton of money so I try and keep the projects I make as simple and affordable as possible. I have found if you have these few crafting essentials then you can make just about anything!
*Scrapbooking paper.
I probably have thousands of sheets of different scrapbooking paper. I try to only buy it when it's on sale so I don't end up spending a fortune!
*Ribbon
I LOVE ribbon. It's a great embellishment for any project and I also only buy ribbon when it's on sale. The type of ribbon I use the most is grosgrain.
*Buttons
I don't think it's any secret that I love using buttons! I LOVE buttons! I can't buy enough of them! They really make any project I am doing better and more finished looking.
*Mod Podge
I love using Mod Podge. It is so easy to work with and makes glueing paper on surfaces sooo much easier! The type I use the most is the matte finish.
*Distressing Ink
I am a big fan of making things looked distressed and used. I love using distressing ink, and when I don't have distressing ink I just use some paint and a dry brush to get the same effect.
*Hot Glue
Okay, I have a love hate relationship with hot glue but it makes glueing buttons, ribbons, and other embellishments soo much easier.
I know I have been a total slacker lately, but I am going to try to post more often! I don't know how people update their blogs once a day! I am so jealous of them!
Anyways, I hope everyone has a great weekend!
Sunday, October 4, 2009
Rag Pumpkin Tutorial
 Today I spent some time with my mom and we made a fabric rag pumpkin! It was really easy and turned out so cute! I am going to have to make another one!
 Here's how to make it:
Step 1: Make your pattern. We had a fabric pumpkin that we kind of went off of and made a pattern out of that.

Step 2: Pin your pattern on your fabric and cut out.

Step 3: Use 6 coordinating fabrics and cut the same pattern out for each fabric.

Step 4: Pin 2 of the pieces together. (WRONG sides together, this is so we can make it rag like)

Step 5: Sew about a 1/2" seam and then add your next piece and sew that on until you've sewed all six together.

Step 6: Sew the first piece to the sixth piece so that you've sewed the whole thing together.

Step 7: To make it rag like, you will need to snip the fabric where you sewed your pieces together. Snip it about every 1/4" careful not to snip your seams!!

Step 8: Get your fabric wet and then put in the dryer. This helps the fabric fray better and make it more rag like.

Step 9: Stuff your pumpkin with batting after you've dried it and then tie some string around the top of the pumpkin to gather all of the pieces together.

Step 10: Hot glue a stem in the center of your pumpkin where you made your gather and that's it! You could add some leaves or other embellishments to your pumpkin to make it even cuter!

Friday, October 2, 2009
"Give Thanks" Frame
I have had this frame for a while now, I actually have quite a few frames like this that are just collecting dust so I decided to make it into a fall decoration!


To make this all you need is:
Frame
Scrapbook paper
Mod Podge
Hot Glue
Embellishments (buttons, stickers, ribbon)
To start I traced each little frame section on the glass with a washable marker so that I had an idea where each piece would go.
I used a lot of reds, browns, and golds and just used what I had laying around to make each section. I used my cricut (Stretch your Imagination) for the trees and the leaves. I also cut out the letters "Give Thanks" with (Alphalicious) The sticker quotes are from 7gypsies and then I just tied everything together with a couple of buttons and some ribbon.
I glued everything right on the glass of the frame so the back would be clear.
You can really make this for any season or holiday! I think a Christmas or Halloween one would be really cute as well!!
Friday, September 25, 2009
Fall Decoration
I love the fall and I love decorating my house with all of the fall colors, but I am running out of room to put all of my creations! :) I still have a ton of tiles left from when I bought them about a month ago so I decided to make some Fall tiles and I mounted them on a piece of wood that I painted. If you don't have any tiles you could easily make these with chipboard (or use cereal boxes) To make them all you need is some coordinating scrapbook paper, ribbon, and buttons. I cut out the letters using my Cricut Machine (Alphalicious) I also used some stickers from 7gypsies. Here is the finished product:


Subscribe to:
Posts (Atom)