Monday, March 29, 2010

Mod Podged Bird House with Frame

Hey Everyone, if you weren't able to check my tutorial out at Mod Podge Rocks, here it is!
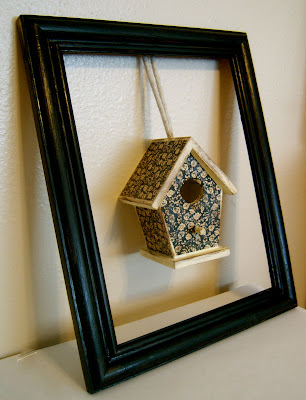
So here it is! My Mod Podged Bird House with frame!


Let's get started!


Supplies Needed

1 wood bird house
1 8 x 10 black frame. (i had an old frame i painted black)
antique white paint
Scrapbook paper
Mod Podge
Distressing Ink
Hot glue


Step 1: If your frame isn't black, paint it!

Step 2: While your frame is drying, Paint your bird house with the paint of your choice, I used antique white


Step 3: After your house is dry, distress it with some distressing ink! And then it's time to measure the dimensions of the sides, front, and top of your house! Once you have measured these, cut your paper to fit


Step 4: Apply a thin layer of mod podge on your house then lay your paper over that and apply another layer of mod podge to seal the edges.


Step 5. After your mod podge is dry, hot glue the rope to the back of your frame!!


How easy is that! Only 5 steps!!!!
I love how it turned out and it was so simple anyone can do this!!


Wednesday, March 24, 2010

Mod Podge Rocks


Hey everyone! I just wanted to let you know I am guest posting over at Mod Podge Rocks today!!! So be sure to stop by and check out my tutorial for this Mod Podged Bird House with frame!


Sorry there has been a lack of posting lately! Life has been hectic, and I hope to be back to regular posts soon!

Tuesday, March 23, 2010

"Grow" Flowers Frame

If you weren't able to check out my tutorial on Someday Crafts last week, here it is! :)

Today I am going to show you how to make a simple frame for a little girl's room. I have a 2 1/2 year old daughter and I am slowly starting to decorate her room. I am doing this one small project at at time and this project is so perfect for her room! It is so simple and cute and would be great on a shelf or dresser!


Okay, let's get started:

Supplies Needed
1 4 x 6 wood frame
Paint
mod podge
hot glue
Scrapbooking paper
buttons
ribbon


Step 1: paint your frame.


Step 2: While your frame is drying, take the chipboard piece out. This is what we are going to mod podge everything to. Cut out a 4 x 6 piece of paper to fit the piece of chip board.


Step 3: Mod podge your piece of paper on the chip board.


Step 4: While your mod podge and paint is still drying, make some paper flowers. You will need a total of six for this project.


Step 5: cut out the word "grow" (or any other word you prefer) Mine is 1" tall and is from the cricut cartridge "home accents"

Step 6: Cut out a small piece of coordinating paper 2 1/2 x 6 inches and distress the edges with the color of your choice. I used a greenish color for this project.


Step 7: Mod podge the strip of paper onto your main piece of chipboard. I did mine towards the top. Mod podge the word grow in the bottom, right hand corner.


Step 8: hot glue a piece of ribbon across your piece of paper


Step 9: Hot glue three paper flowers in the middle of your papers


Step 10: Hot glue the 3 remaining flowers on the edge of your frame.


Step 11: Distress the edges of your frame. I also did this with a greenish color!


And you're done!

I hope you like it!


Don't forget to stop by Inspiring Creations and get some inspiration of your own!

Thanks Michelle for letting me guest post today!

Tuesday, March 16, 2010

Picture Puzzle Magnets


My daughter loves to play with puzzles, so I thought why not make my own and make them into magnets so she can play with them on the fridge! It is really simple to make and doesn't take much time at all!


Okay let's get started!

Supplies Needed

Chipboard
Paper
Picture of your choice
Mod Podge
Magnets
Hot glue


Step 1: Cut out a piece of chipboard to the size you want for your puzzle.


Step 2: Section off your puzzle into 9 squares


Step 3: Draw different puzzle shapes onto the chipboard. (don't make this too complicated, or else it will be too hard to cut out later!)


Step 4: On the OTHER side of your chip board mod podge a piece of paper the on the top. This will be the frame for your picture.


Step 5: Mod podge your picture on top of the piece of paper.


Step 6: Let your mod podge dry.


Step 7: Turn it around and cut out the pieces


Step 8: Hot Glue a magnet on each piece

Step 9: Distress the picture!

And you're done!


This project was so easy and you could use any picutre you'd like!


Sunday, March 14, 2010

Someday Crafts

Today I am guest posting over at Someday Crafts! I love Michelle's blog, and if you haven't been over to see her blog, you should go check it out! You will be hooked! She features so many great projects and has an awesome linky party every Wednesday that I love!

Over at Someday Crafts, I am showing you how to make this cute girly frame!


So be sure to go check out Michelle's blog and my tutorial!


Monday, March 8, 2010

Vintage Puzzle Piece Magnets!!


I am so excited to share this project with you! A lot of people ask me where I get my ideas and to tell you the truth they usually just pop into my head at the most random times.

This project for example came to me the other night when I was putting my 2 year old to bed. I was sitting on the floor in her room and I noticed a puzzle on the floor that has been there for like 2 weeks now. The puzzle was missing some pieces so I immediately thought....wow I could make those into magnets! I was so excited about the idea that I started making them immediately and I haven't been able to stop!!!!

So here they are!


Here is the tutorial

Supplies needed:

Old puzzle pieces
Mod Podge
Scrapbook paper
Hot glue
Buttons
Ribbon
Magnets


Step 1: Choose your puzzle piece. The pieces I used are the thick wood puzzle pieces for childrens puzzles. You could also use other types of puzzle pieces!

Step 2: Trace your puzzle piece on your paper. I used all vintage looking paper.


Step 3: Cut out your paper.


Step 4: Apply a thin layer of mod podge on the top of your puzzle.


Step 5: Place your cut out paper on top.


Step 6: Place your piece upside down so it doesn't bubble. Sit it there until it's dry.


Step 7: Using a nail file, file the edges so you can get the excess paper off and that the paper is flush with the puzzle piece.


Step 8: Apply a thin layer of mod podge on the top to seal the edges. Let dry then distress your piece with some distressing ink.


Step 9: Hot glue some ribbon.


Step 10: add a paper flower and buttons for more embellishments.


Step 11: Hot glue your magnet to the back of the piece


And you're done!


Which one do you like the best?


PS: I have a big announcement coming up this week! So be sure to check back often! :)

I am participating in the following parties:
Check out my sidebar for the complete list.


Tip Me Tuesday


Motivate me Monday