Sunday, August 30, 2009

Rag Quiliting


Like I have mentioned before, I am not great at sewing and I am still learning the basics. So, I haven't done many sewing projects. My mom taught me how to do the "rag" sewing technique and I do have to say I really enjoy doing that technique because you don't have to sew perfectly!! So these are some projects that I have done using this technique!!

This pillow was actually supposed to be a wall hanging that I was trying to make....but it didn't turn out quite how I wanted it to so I turned it into a pillow.

This Table Runner was my first sewing project ever! It was great for a beginner project!


I saw the idea of making a bag into a "rag" bag and decided to make a scripture bag for church. It wasn't too hard and I think it would be cute to make an everyday "rag" bag.

Sunday, August 23, 2009

"love" Tiles


I went up to my mom's house today and did some more tiles. She attached her tiles to an old cupboard door. I love how it turned out. Mine are the ones below I will be hanging them with ribbon......I just don't know where yet!


Friday, August 21, 2009

Versatile Magnet Board


I have had an old magnet board lying around forever that needed a revamp!!! I made it so I could use it all year round and hang up just about anything!


Materials Needed:
1 Magnet Board
2-3 Pieces of scrapbook paper
Mod Podge
Sponge Brush
Paint
An old rag or Paper towels


Step 1: Cut your scrapbook paper to fit the size of your metal piece from your magnet board.
Step 2: Apply a layer of Mod Podge to the metal layer of your magnet board and place your pre-cut paper on top of the mod podge.
Step 3: Apply another layer of mod podge on top of your paper. I just did this to protect the paper.
Step 4: If you want to make your Magnet Board look a little old and rustic, water down some paint (the color of your choice) and apply a very thin layer and wipe off quickly with a paper towel or old rag.


Step 5: I had a Clip that I was able to hot glue to the board so that I could clip anything on my board or I attach anything with magnets! There are endless possibilities. I have made a couple of things to hang on mine so far. I can't wait to make something for every holiday/season!


"Joy" Tiles


I ran into an awesome deal and got a whole box of small tiles for 4 bucks! So I'm sure you will be seeing a lot of projects with tiles in the near future. Here is the first one I made.


Craft Night Project!

This post is a little late, but this is one of the two projects we made for our craft night last week. We used old cupboard doors and made them into chalkboard frames! They turned out super cute and they were really easy to do!


Monday, August 17, 2009

Upcycling Cans!

I have been saving all of my old cans so that I could make them into cute pen/pencil holders! These are great to store anything from pens and pencils to buttons and brads. They would also be a great gift for a teacher!! Here is a basic tutorial on how to make the base of your pencil holder.

Step 1: Choose a can that is big enough to hold some pens and pencils. (you can take off the paper wrapper or leave it on. I did it both ways.)

Step 2: Measure the length of your can and mark it on the paper you will be using to cover the pen. Then cut it to fit the can.


Step 3: Apply a layer of Mod Podge on the paper that you just cut out and wrap it around the can and then seal the edge with more mod podge.
Step 4: Decorate with buttons, ribbon, and other embellishments to make it your own!


Wednesday, August 12, 2009

More Bedroom Decor....


This project was originally supposed to be a fabric covered cork board.....but turned into a bedroom decor for the master bedroom. I painted an old frame black and then sanded it to make it look old and rustic. I then glued some fabric on some cork (i did this because it was going to be a cork board, if i were to do this again i would put the fabric on something else like cardboard) I then made the letter W with some chipboard and painted it black and embellished it with some gold dots and some old keys. I then added the hardware, buttons, and ribbon and finished it off with some more gold around the edges.

Tuesday, August 11, 2009

Wedding Album


I made this album for our wedding a few years back and decided to share it with you all. To make the scrapbook I used a chipboard album and all the hardware is from a company called 7gypsies. I used all vintage looking paper and used modpodge to glue all the paper on to the album. I embellished it with a vintage doorknob, keys, and some black buttons with words. For the picture, I just made a frame out of chipboard and covered it with some coordinating paper and put our engagement photo in and then attached the keys at the top. I would like to make another one, but I haven't been able to find a chipboard album as big as the one in the picture. I do plan on making something similar to this album and hope to post a tutorial on it as well!

Craft Night

I just wanted to give everyone a heads up that we are having a craft night on September 16. We are making decorative blocks that say "happy harvest" the cost is ten dollars and if you are interested in coming then i need to know by August 17th. It is going to be in Salem and we will be meeting sometime between six and seven. If you want to come please let me know ASAP. You can email me at [email protected] or leave a comment. Thanks!

Monday, August 3, 2009

Bedroom Decor

Brandon informed me the other day that I was done decorating every other room in the house and that i needed to start decorating our Bedroom. I don't know why, but I always do our bedroom last because I haven't really decided on what I want to do with our bedroom. So I have decided that I want to go with a more vintage look. With deep reds, golds, and browns.


I have made two of the three pieces of wall art. I am making them out of pieces of wood from Hannah's Dresser that broke when we moved. So all of the material I had on hand so this project didn't cost me a dime!


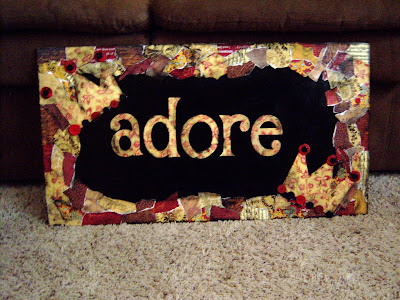
The first thing I did was paint the pieces of wood with black paint.


I then picked out all the paper I was going to use. I used most everything from a company called 7gypsies. They sell scrapbook and hardware supplies that have a very vintage feeling. I picked about 8 different pieces of paper. Some were red, gold, black, and brown.


I then ripped the paper into different pieces and sizes and mod podged them into place. I didn't do any kind of pattern because I wanted it to look rustic and old.


I cut out the words: love, cherish, and adore. ( I haven't made the one that says cherish yet)
I mod podged each word in the middle of the board.

To make everything come together I brushed everything with some black paint and wiped it off.

The one that says "love" I added three black keys with some ribbon as well as some black and gold buttons on the bottom that say different words.

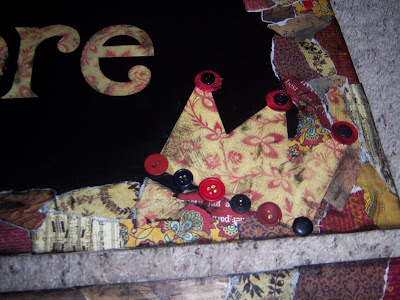
The one that says "adore" i added two crowns and embellished them with buttons.

I love using mod podge, but i used a glossy finish for this project and i would have rather used a matte finish so i might go over them again with a coat of mod podge but use a matte finish.